- Dashboard
- Manage Leads
- Manage Tasks
- Manage Contacts
- Billing & Subscription
- Manage Accounts
- Track Activities
- Migration
- Manage Your Team
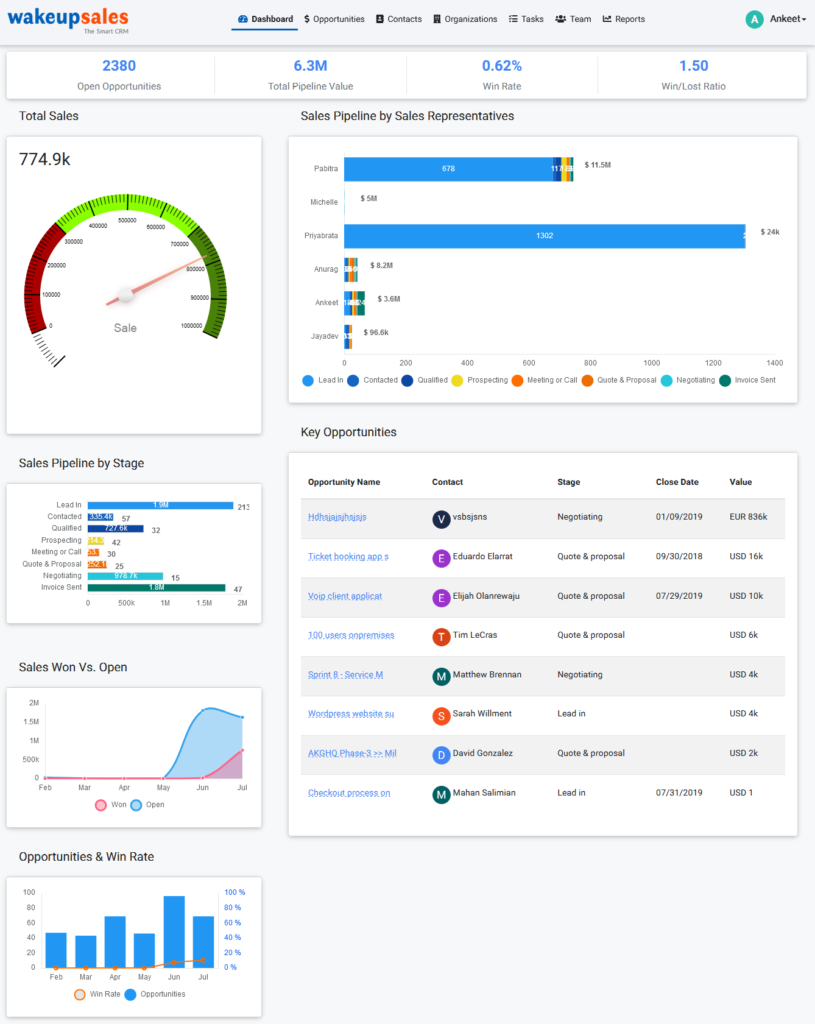
If you’re using Wakeupsales CRM, you simply can’t miss the Dashboard page. It’s where you get to see a bit of everything that’s happening in your CRM. To note everything down:
- Lead/Opportunity Stages
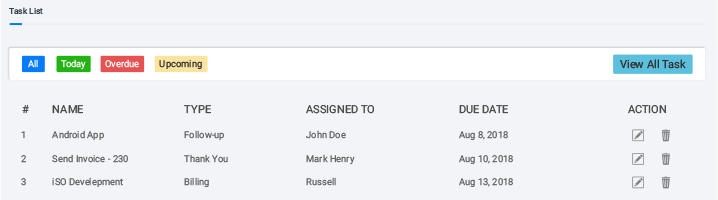
- Tasks Listing in short
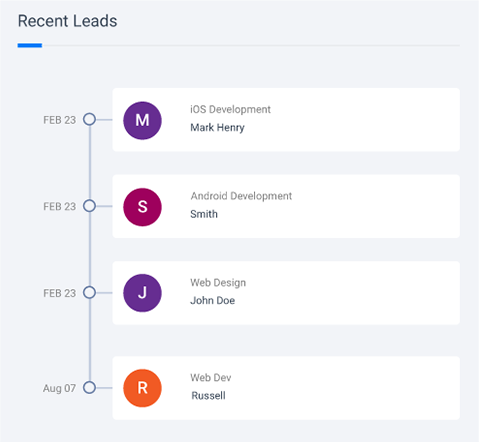
- Recently Added Leads
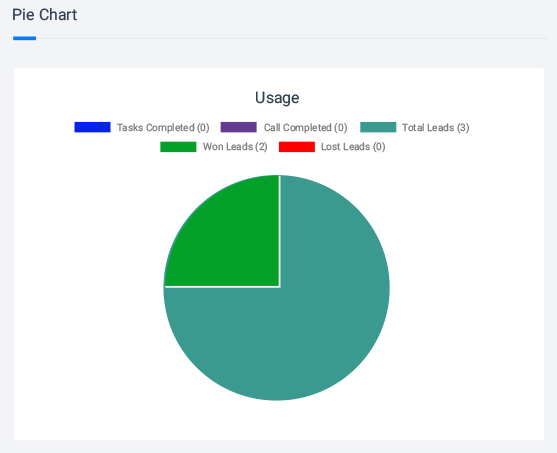
- Usage
- Last 3 months Summary
- Displays All, Today, Overdue & Upcoming tasks in a tab structure
- For every tab selected, it shows a short list of tasks with options to edit/delete
- If you want to go directly to task listing from here, just click on ‘View Task Listing‘
We thought it would be helpful if we show a few of the most recently added leads/opportunities, right on the dashboard. Take a look at whom it’s assigned to, when was it added & if you want to view more… just go to the bottom & click on ‘View More‘.
- Tasks Completed: All assigned to/created by tasks if completed
- Call Completed: All completed tasks with ‘Call‘ task type & assigned to you
- Total Leads: Combined number of Leads/Opportunities present in your CRM
- Won Leads: All the Leads/Opportunities that have been marked as ‘Won’
- Lost Leads: All the Leads/Opportunities that have been marked as ‘Lost’
Note: Calculated counts for last 3 months.
- Total Calls
- Shows the number of Tasks with task type set as ‘Call‘.
- If you want to check out the task list, just click on ‘READ’.
- Total Appointments
- Shows the number of Tasks with task type set as ‘Appointment‘.
- Click on ‘READ’ to see it all.
- Total Leads to Nurture
- Shows the list of leads/opportunities that are ‘New’ & have been added within last 3 months.
- If you want to check them out, click ‘READ’.
- Last Lead Closed
- Shows the latest lead/opportunity that has been closed, along with the responsible team member of yours.
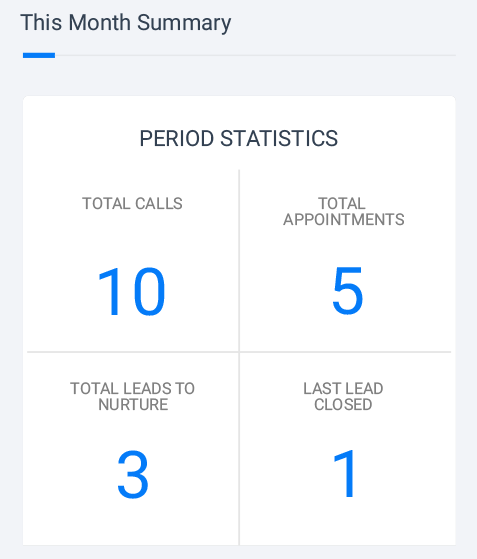
Note: Calculated counts for last 3 months.
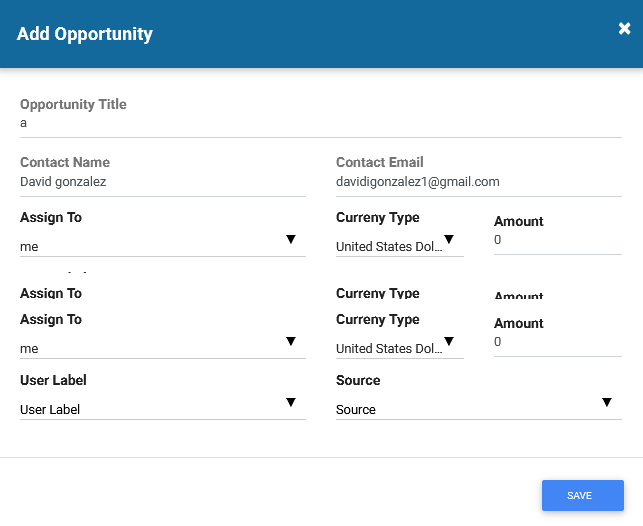
ADD A LEAD/OPPORTUNITY
Adding a lead/opportunity is pretty easy in Wakeupsales CRM. Just a few basic info & you’re set.
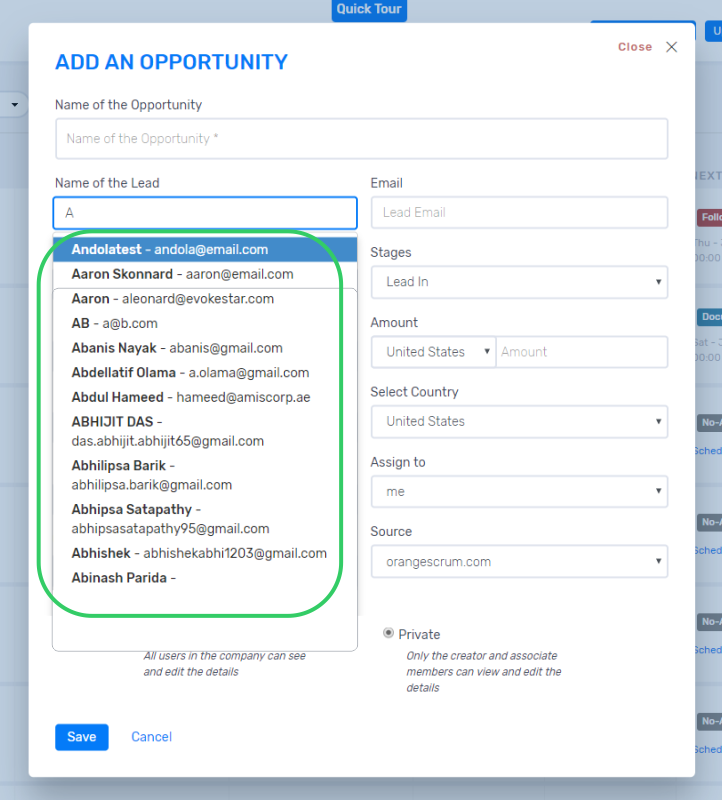
- To add a Lead, move to ‘Quick Links‘ on the header from anywhere inside Wakeupsales CRM & under the ‘New‘ section… select ‘Lead‘. If you’re already in the Leads listing page, you can also Create a New Lead/Opportunity from the (+) icon you see on your bottom right corner.
- Enter a basic set of information; make sure to especially fill-up all mandatory fields.
- The Lead name is auto-suggested, from your contacts list.
- If the desired contact doesn’t exist, a new individual contact is created and associated with the lead.
- On creating a lead/opportunity, an email will be sent to the assigned user.
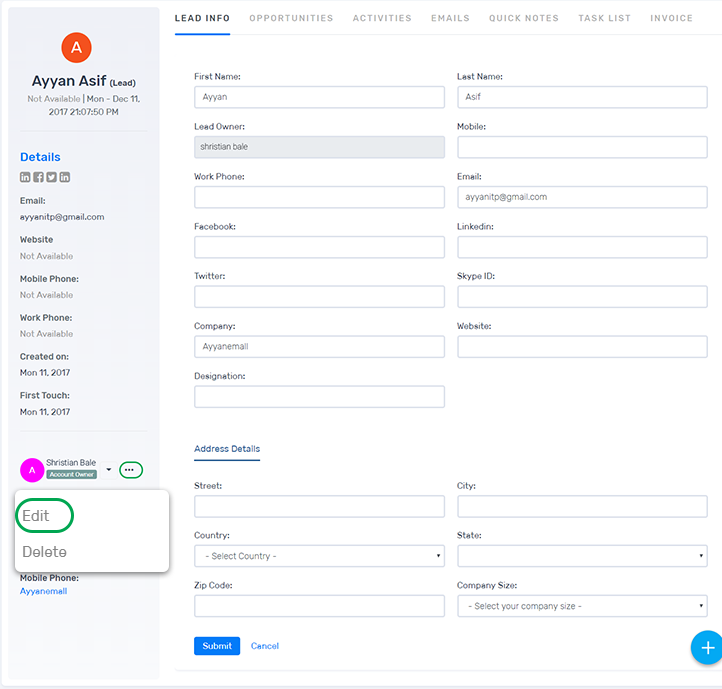
 EDIT LEAD/OPPORTUNITY
-
Quick Edit
- If you’re on the Lead Listing page & feel like you need to make a quick change to one of your leads/opportunities… Select the lead > Click on the 3dot(…) menu > Select ‘Quick Edit‘.
- A popup appears right there, with some of the most important fields. Click on anything you wish to change & Update. It’s that easy!
-
Edit
- If you decide to make some detailed changes to a lead/opportunity, select the Lead > click on 3dot(…) menu > Select ‘Edit‘.
- Everything from its Priority to the Amount worth… change whatever you wish & click on ‘Update‘.
- You can also associate another existing contact, with a lead/opportunity by clicking on ‘Associate a contact‘ on the top right corner.
- Just punch in a few basic info & click ‘Save‘.
- If you decide to make some detailed changes to a lead/opportunity, select the Lead > click on 3dot(…) menu > Select ‘Edit‘.
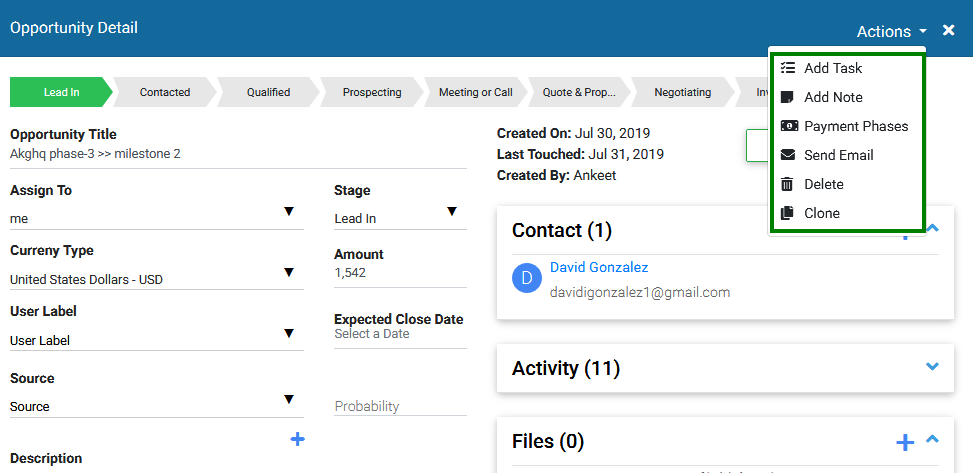
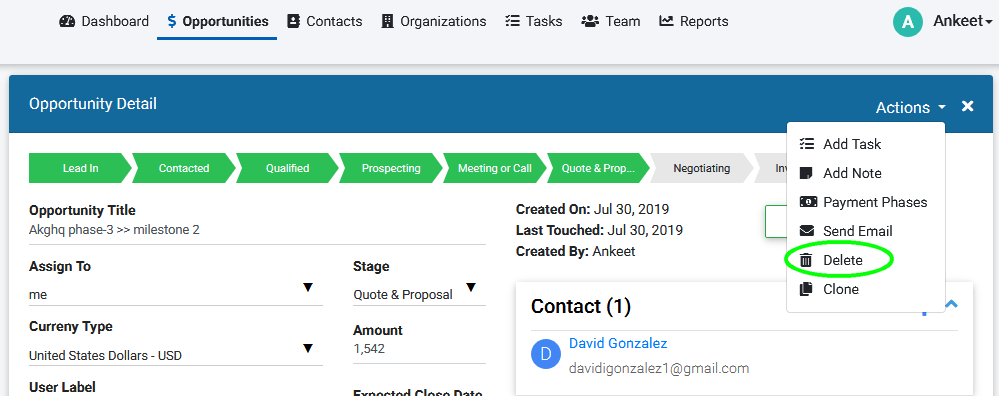
DELETE LEAD/OPPORTUNITY
- There are two ways to delete a lead/opportunity; one from the Leads Listing page & another from the Leads Details page.
- If you’re on the Lead Listing page, select a Lead you wish to delete. Click on the 3dot(…) menu & select ‘Delete‘.
-
 If you’re inside the Lead Details page, you’ll see a delete icon on the middle section. Click on it & confirm. That’s it.
ADD A LEAD/OPPORTUNITY
Adding a lead/opportunity is pretty easy in Wakeupsales CRM. Just a few basic info & you’re set.
- To add a Lead, move to ‘Quick Links‘ on the header from anywhere inside Wakeupsales CRM & under the ‘New‘ section… select ‘Lead‘. If you’re already in the Leads listing page, you can also Create a New Lead/Opportunity from the (+) icon you see on your bottom right corner.
- Enter a basic set of information; make sure to especially fill-up all mandatory fields.
- The Lead name is auto-suggested, from your contacts list.
- If the desired contact doesn’t exist, a new individual contact is created and associated with the lead.
- On creating a lead/opportunity, an email will be sent to the assigned user.
EDIT LEAD/OPPORTUNITY
-
Quick Edit
- If you’re on the Lead Listing page & feel like you need to make a quick change to one of your leads/opportunities… Select the lead > Click on the 3dot(…) menu > Select ‘Quick Edit‘.
- A popup appears right there, with some of the most important fields. Click on anything you wish to change & Update. It’s that easy!
-
Edit
- If you decide to make some detailed changes to a lead/opportunity, select the Lead > click on 3dot(…) menu > Select ‘Edit‘.
- Everything from its Priority to the Amount worth… change whatever you wish & click on ‘Update‘.
- You can also associate another existing contact, with a lead/opportunity by clicking on ‘Associate a contact‘ on the top right corner.
- Just punch in a few basic info & click ‘Save‘.
- If you decide to make some detailed changes to a lead/opportunity, select the Lead > click on 3dot(…) menu > Select ‘Edit‘.
DELETE LEAD/OPPORTUNITY
- There are two ways to delete a lead/opportunity; one from the Leads Listing page & another from the Leads Details page.
- If you’re on the Lead Listing page, select a Lead you wish to delete. Click on the 3dot(…) menu & select ‘Delete‘.
-
If you’re inside the Lead Details page, you’ll see a delete icon on the middle section. Click on it & confirm. That’s it.
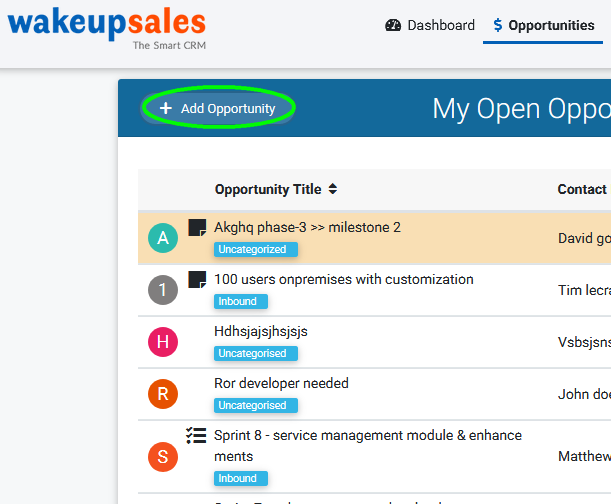
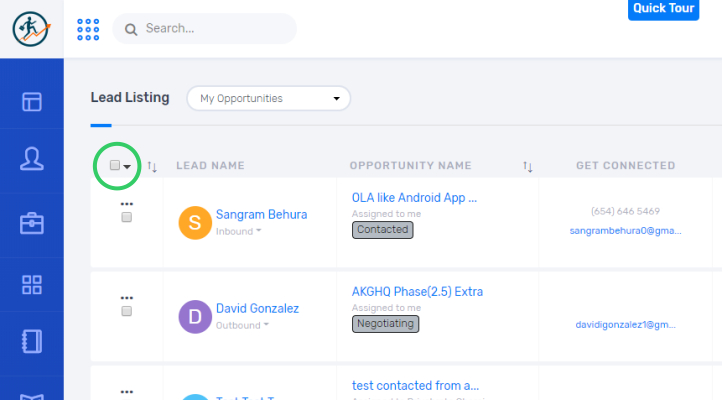
- In short, this is where most of the action is in Wakeupsales CRM.
- All your leads/opportunities will be listed here with their respective stages, next actions, associated contacts & so much more.
-
On the top, you can set filters like all opportunities, my opportunities, all closed opportunities, all lost opportunities etc to view the leads with their associated opportunities.
- Every Lead/Opportunity listed in this page also has a detailed page. Click on the opportunity title to explore the same.
- If you want to send an instant email to one of your leads, just click on the email in Lead Listing page & a popup appears to make it easier for you.
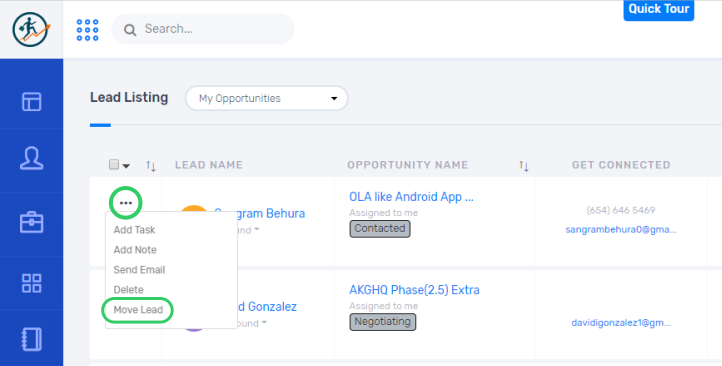
- We also have a 3dot(…) menu in the Lead Listing with the following actions:
- Add task
- Add note
- Send email
- Delete
- Move lead
- In short, this is where most of the action is in Wakeupsales CRM.
- All your leads/opportunities will be listed here with their respective stages, next actions, associated contacts & so much more.
-
On the top, you can set filters like all opportunities, my opportunities, all closed opportunities, all lost opportunities etc to view the leads with their associated opportunities.
- Every Lead/Opportunity listed in this page also has a detailed page. Click on the opportunity title to explore the same.
- If you want to send an instant email to one of your leads, just click on the email in Lead Listing page & a popup appears to make it easier for you.
- We also have a 3dot(…) menu in the Lead Listing with the following actions:
- Add task
- Add note
- Send email
- Delete
- Move lead
- There are two ways to change the Stage of a Lead if you wish to.
- Lead Listing > Select a Lead > Click on 3dot(…) Menu > Select ‘Move Lead‘
- Choose the stage of your choice & save.
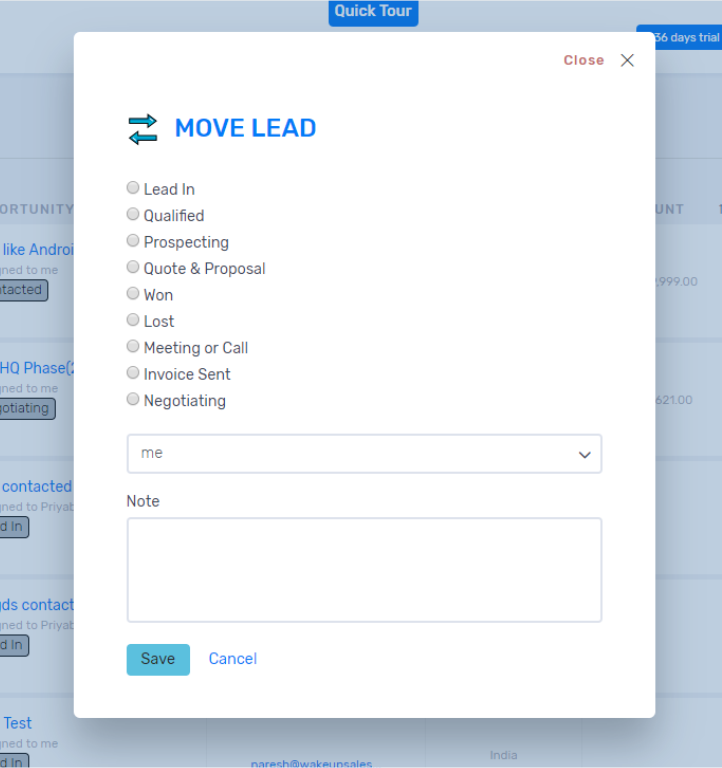
- Lead Listing > Select a Lead > Click on 3dot(…) Menu > Select ‘Move Lead‘
- The second way to change a ‘Lead Stage‘ is even easier. If you’re in the Lead Listing page, just select a lead > click to the right of its stage & you’ll see a list of available stages. Select one & voila! Over in a second.
In the ‘Add Lead’ pop-up, start typing the name of your client & a suggestion will appear. Select the profile & you can add as many opportunities as you want. It’s that Easy!
- Imagine if you’ve to perform actions that involve a series of leads/opportunities. Wakeupsales CRM has it covered.
- If you’re on the Lead Listing page, you’ll see a checkbox option at the start of the listing table (left top corner). Click on that and you’ll get the following options:
- Move Leads: If you want to move multiple leads/opportunities to another stage.
- Delete Leads: If you simply want to send a few leads/opportunities to trash.
Pretty handful feature, if you have a ton of things to look after 🙂
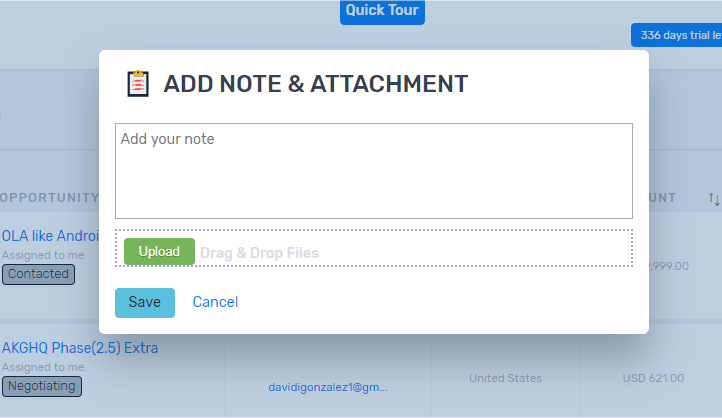
If you’re on the Leads Listing page & wish to add a note under any of the lead/opportunity, it’s very much possible.
- Select the Lead > Click on the 3dot(…) menu > Select ‘Add Note‘.
- Add your message. Attach a file (if any) & Save.
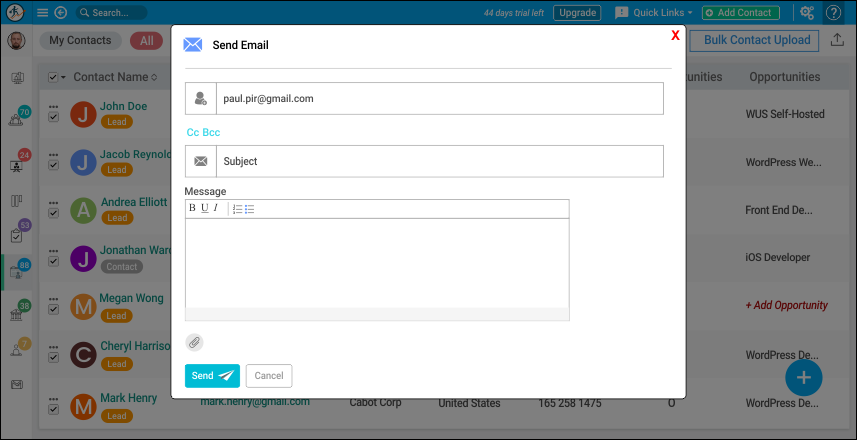
Sending an email to a lead on his registered email id is just a matter of few clicks in Wakeupsales CRM. There are two ways to go about it.
- Select the Lead > Click on the 3dot(…) menu > Select ‘Send Email‘
- OR just click on the email mentioned in Lead listing & a popup appears.
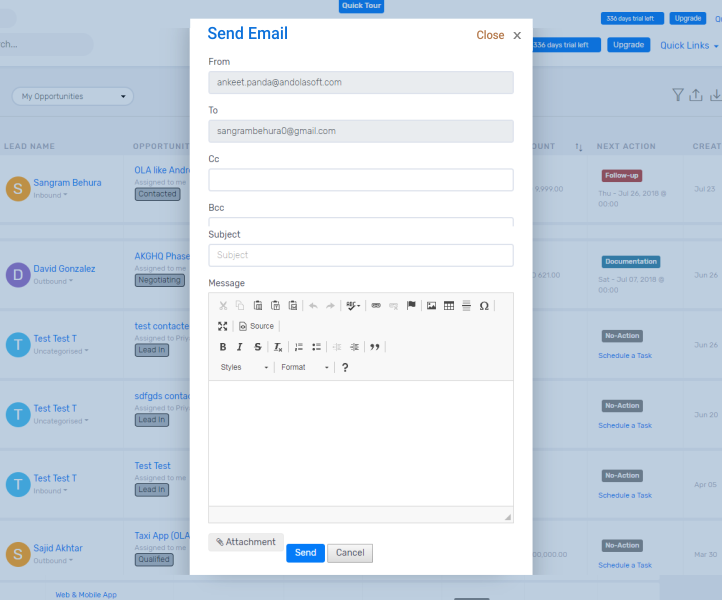 The popup will come pre-filled with the lead’s email (who’ll receive it). All you have to do is add some other emails in cc/bcc (if any), punch in a subject line followed by the body & click ‘Send‘. Voila!
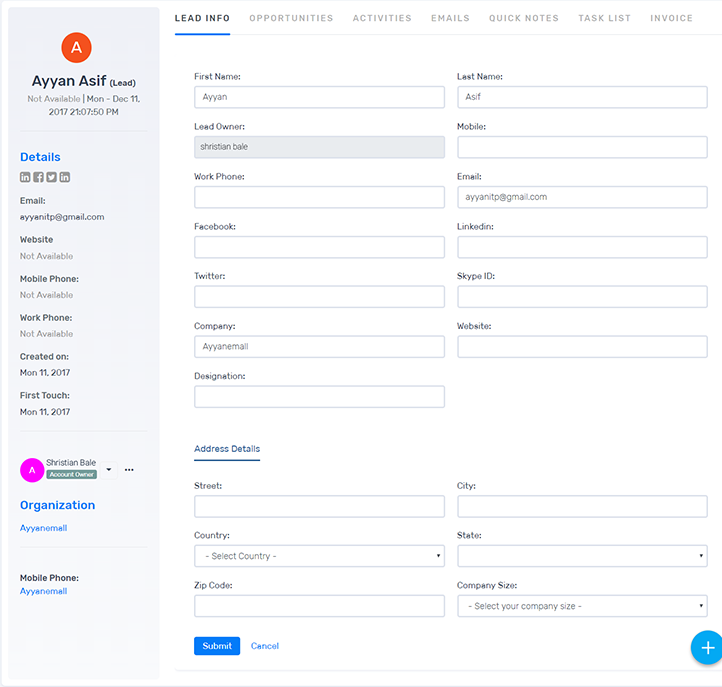
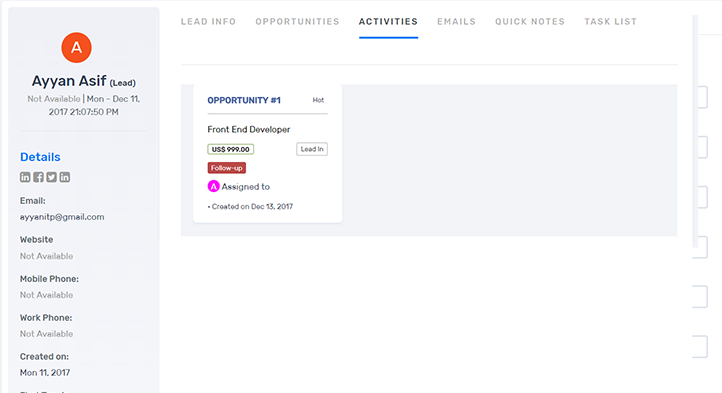
The Lead Details page is where you get to know everything about your lead & the opportunity associated with it. From the contact details & other info about the opportunity, to every task & activity associated with it… it’s all there.
If you’re in a Lead Details page… on the right side, you’ll see an ‘Activity Stream‘. This is where all the major actions undertaken in the name of that particular opportunity are listed together.
It’s super useful if you want to take a quick note on what’s happening.
If you’re in the Lead Details page… and scroll down below, you’ll see a dedicated ‘Task Listing’ section. It curates all the tasks that are assigned under this particular opportunity & lists all together. It also lets you create/edit/follow up or delete a task.

Super useful section… right inside the Lead Details page.
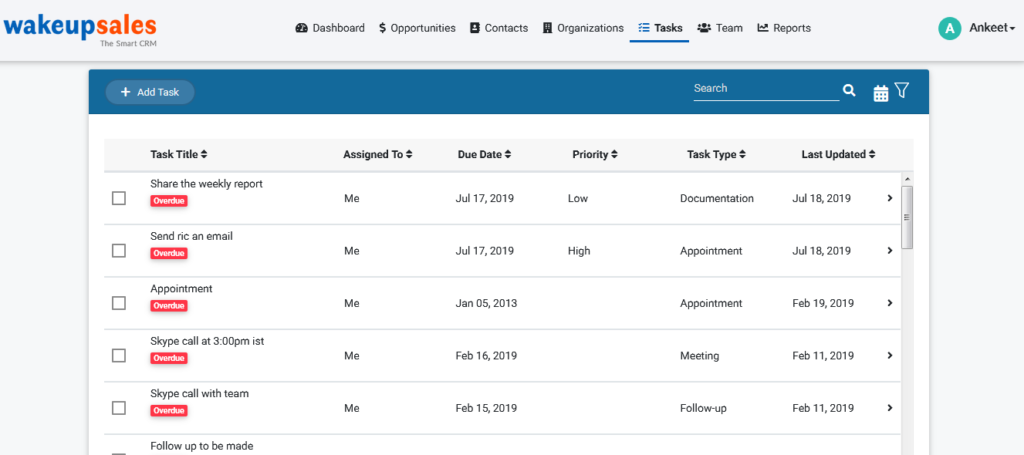
- All the tasks are shown in ascending order as per their respective Due dates.
- It’s easy to track the current status of a task from the tabs on the top
- All
- Both active & completed tasks
- The count displays the number of active tasks
- Today
- Shows all the tasks that are due on the same day
- Overdue
- Gives you a list of tasks that are past their due dates.
- Upcoming
- Tasks with due dates on the horizon.
- Completed
- Shows the list of completed tasks.
- All
-
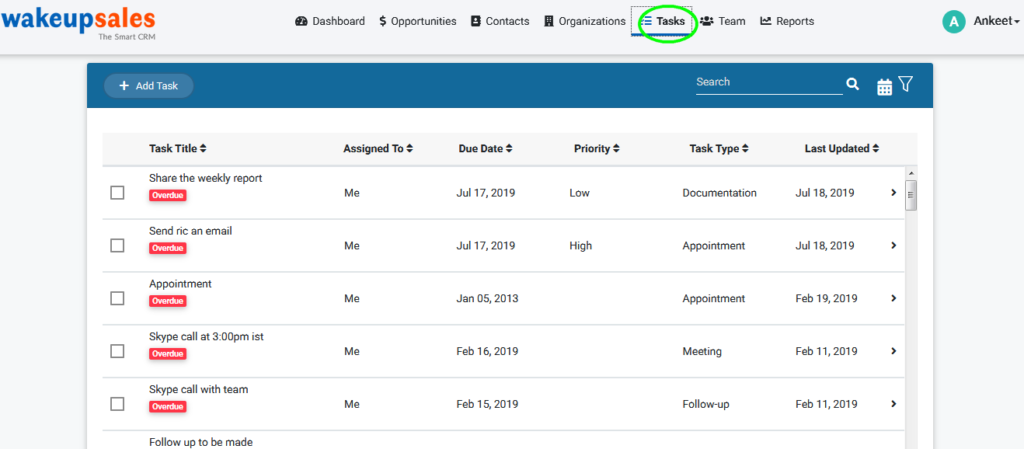 Actions available with each task
- Complete – once the purpose is served.
- Edit – if you want to make any last-minute changes.
- Follow-up
- Delete – to send the task to trash
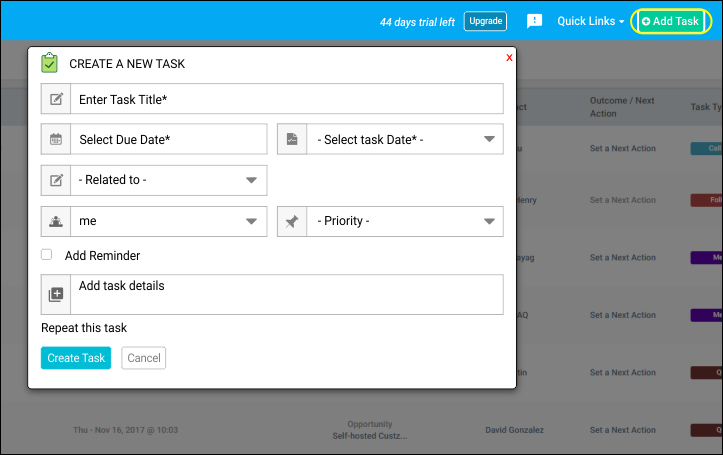
ADD A TASK
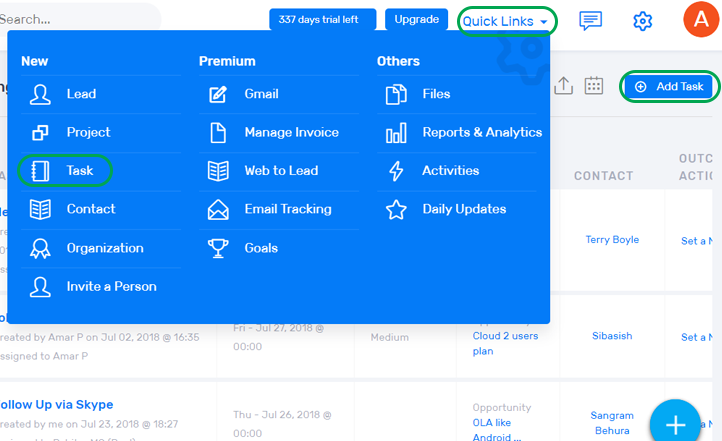
- If you’re on the Tasks Listing page, you’d find the ‘Add Task’ button on the top right corner of your app. Or you can go to ‘Quick Links’ tab anytime from anywhere inside the Wakeupsales app & select ‘Create New Task’.
- Fill-up everything that’s asked for in the pop-up. It’ll hardly take a minute.
- Task Title
- Due date
- When you plan to end the task.
- Task type
- Choose one from a set of task types that come out.
- Assign user
- Select a user you’d keep responsible for the task.
- Mail
- The registered email id of the assigned user will be reflected.
- Assign Opportunity
- While creating a task from header bar, only the leads/opportunities available for the organization will be displayed in auto-suggest.
- For tasks created from the Lead details page, the assign deal field is pre-filled with the lead/opportunity name & can’t be altered.
- Task created from the contact detail page – the assign lead/opportunity field is pre-filled with the contact name & is disabled.
- Note: Only the task created from the contact details page will be associated with the contact
- Once you create a task, the assigned user gets notified via email.
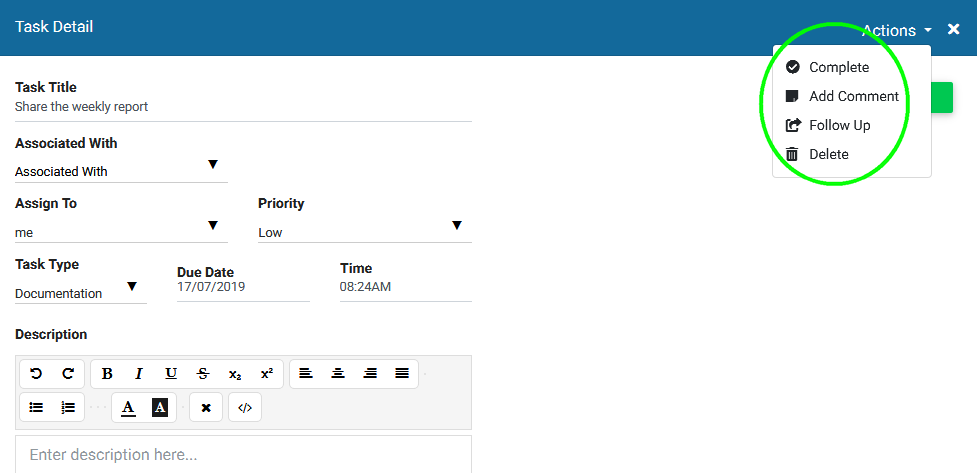
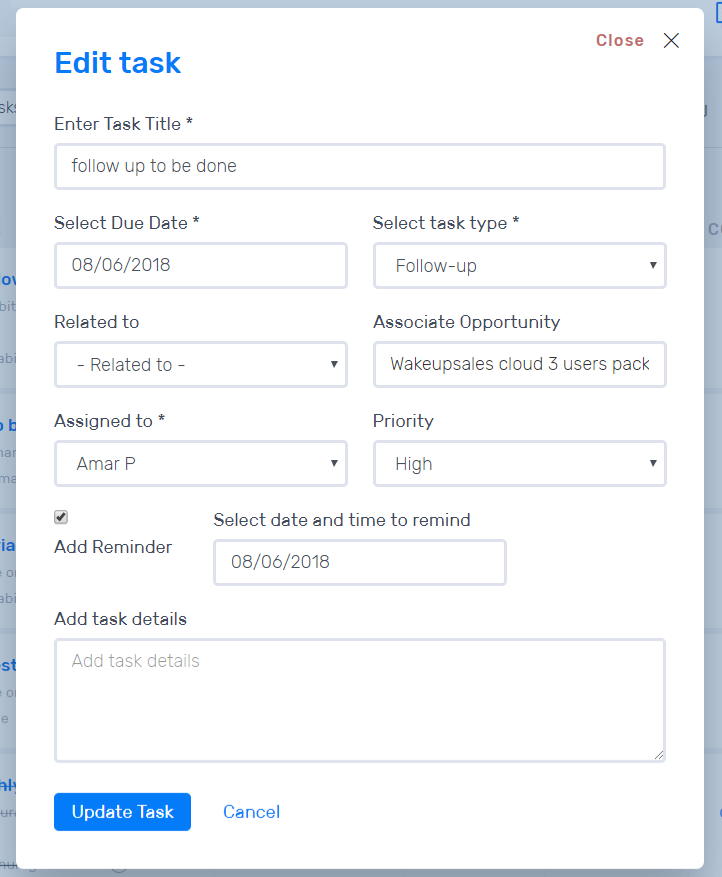
EDIT TASK
Editing a task is possible from the Tasks listing page.
-
- Click on the 3-dot menu(…) of the Task you’d like to edit. Select ‘Edit’.
- You can’t change the associated opportunity on Edit Task pop-up, to make things easier for you.
DELETE A TASK
Deleting a task is possible from the Tasks listing page.
- Click on the 3-dot menu(…) of the Task you’d like to edit. Select ‘Delete’.
- Just confirm ‘Ok’ if you’re sure about it & it’s sent to the trash.
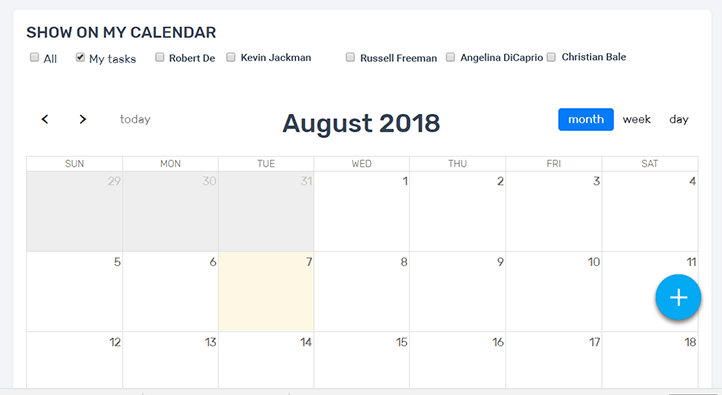
- If you’re on the Tasks listing page, click on the “Calendar View” icon from right-top corner.
- It brings you to a monthly calendar view, full of all your tasks.
- A click on the task, redirects you to the Opportunity details page.
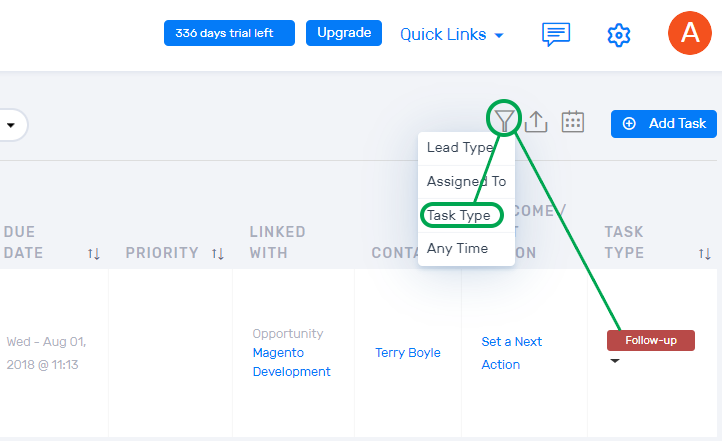
- Available columns to filter on clicking the Filter button
- Lead type
- Assigned to
- Task type
- Any time – Not available in case of calendar view
- Filter value is stored in the cookies. Hence, if the user comes to the tasks listing page after a while… the list is filtered as per the cookie values.
- On clicking the reset button in the header section, all the filter cookies are cleared.
- If you click the close button of a selected filter, the respective filter cookies are cleared.
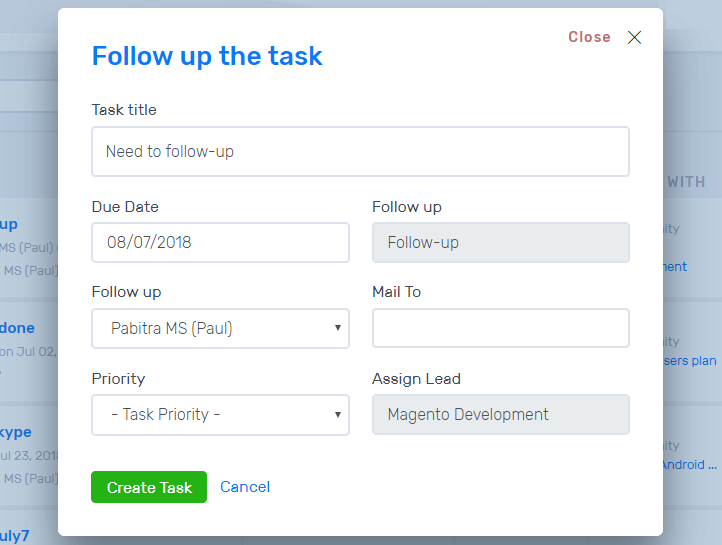
- If you’re on the Tasks listing page, click on the 3-dot menu (…) & you’ll find the option to ‘Follow Up’ a task.
- It’s a useful feature when you want to follow the current task up, with another sister task.
- On the follow up pop-up, the task type and associated opportunity field is disabled.
- Once you click ‘Create Task’ in the pop-up, a new task gets created with the type ‘Follow up’.
- Email is sent to the assigned user in real time. It’s so cool 🙂
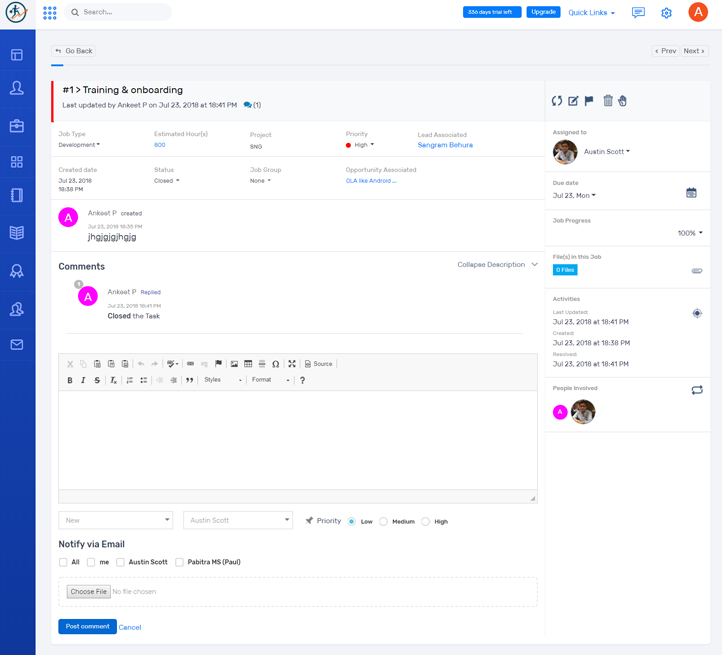
Tasks & Jobs may look same from the outset but are slightly different. In Wakeupsales CRM, tasks are those small activities/reminders that are bundled under an opportunity.
 Whereas, Jobs are the sub-tasks bundled under a Project with their own detailed pages.
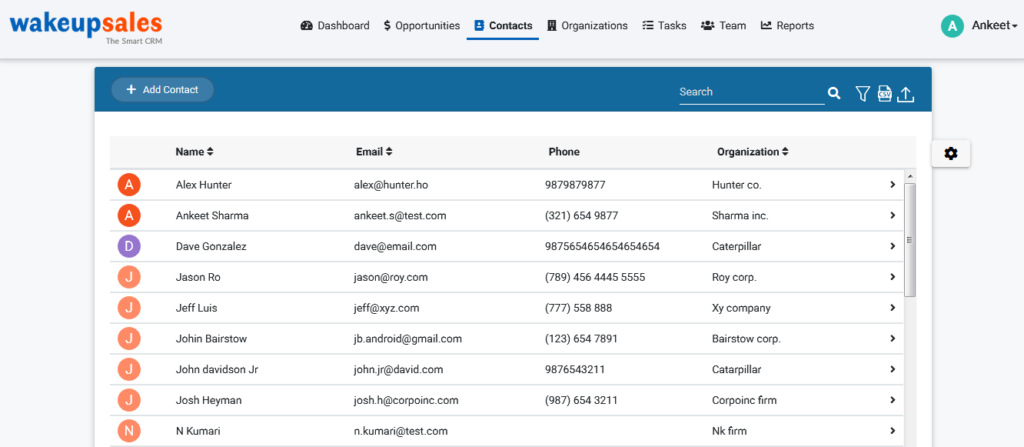
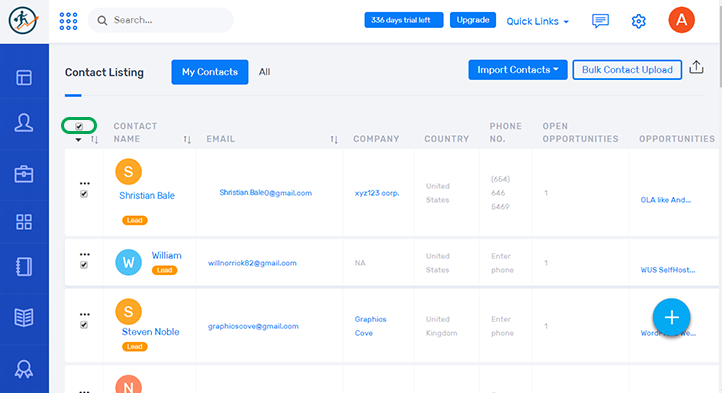
- The ‘Contacts Listing’ page is one of the most important pages in your Wakeupsales CRM.
- Shows the entire list of contacts all at one place, including those imported from external CSV files or taken from lead opportunities.
- On the top you have the option to search through the records, import/export bulk contacts or upload your contacts in a flash.
- Every contact listed here, also has its detailed page. Click on the contact name to explore.
- If you want to send an instant email to any of your contacts, just click on their email id & you’re good to go.
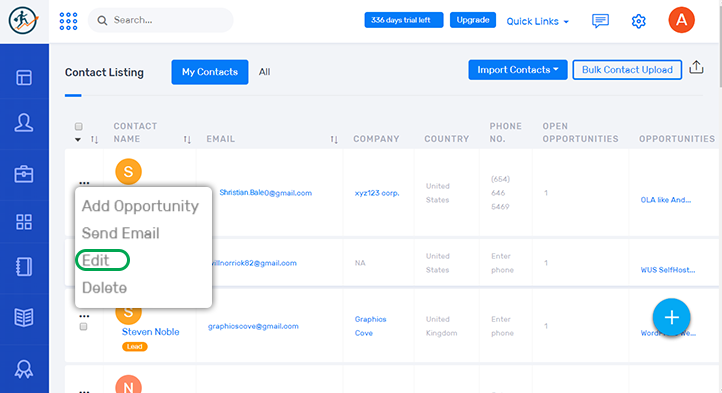
- The 3dot(…) menu lets you do the following:
- Convert to Lead
- Send Email
- Edit
- Delete
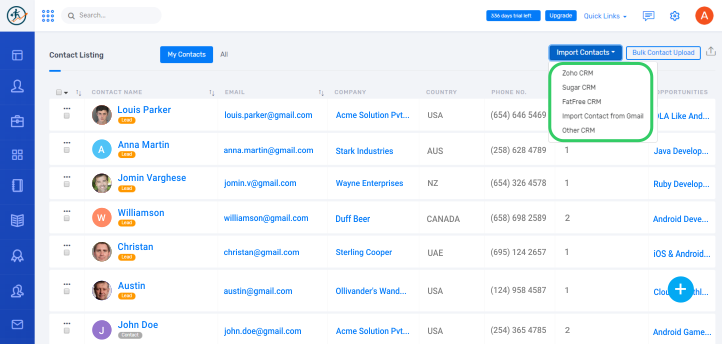
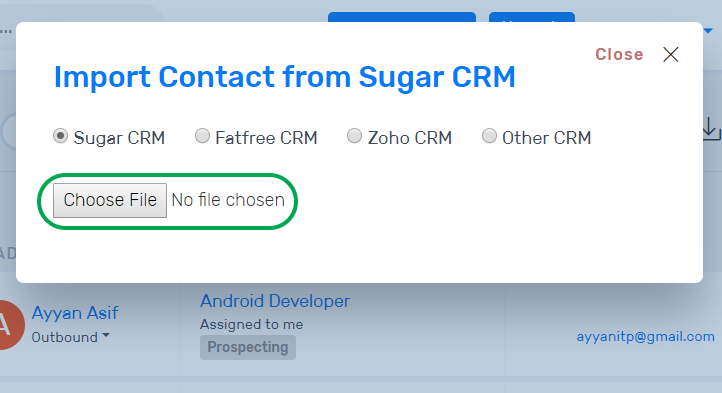
If you’re on the Contacts Listing page… importing all your contacts from older CRMs is pretty easy.
- On the top right corner, you’ll see an option to ‘Import Contacts‘.
- Select a CRM you wish to bring all your data from.
- Upload the CSV file by browsing it from your local storage & click ‘Submit‘.
- All the contacts associated with your previous CRM will be fetched and added to your contacts list.
ADD A CONTACT
- There’re two ways to add a new contact. One is from Quicklinks… where you’ll see the option of ‘Create New Contact‘ or from the blue (+)shortcut on the right bottom corner.
-
 Both actions will lead you to ‘Add a New Contact‘ pop-up where you have to punch in some basic information & click ‘Save‘.
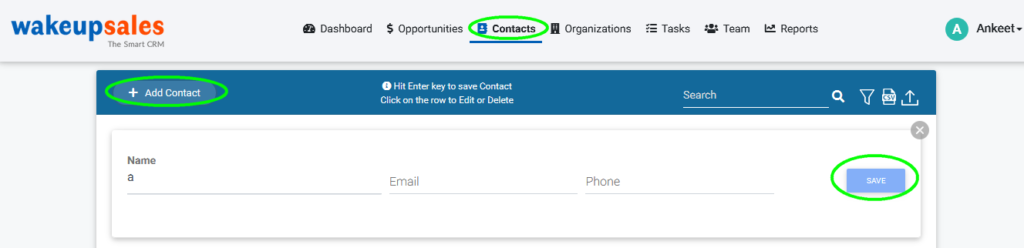
EDIT A CONTACT
- If you’re on the Contacts listing page & feel like updating some info related to a contact, it’s pretty easy.
- Select a Contact > Click on the 3dot(…) menu > Click on ‘Edit‘
- Once you’re done with the work, click ‘Update‘
DELETE CONTACT
- If you’re on the Contacts listing page & wish to trash any of your contacts… select the contact > click on the 3dot(…) menu > Click on ‘Delete‘. It’s that easy!

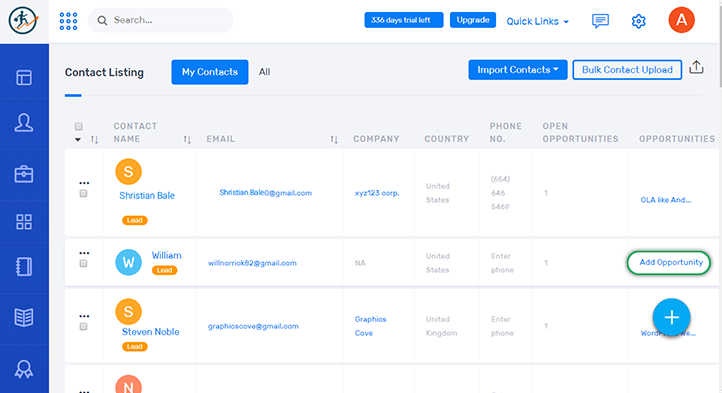
- If you’re in the contacts listing page, there are two ways to add an opportunity for a contact.
-
Select a contact > Click on the 3dot(…) menu > click ‘Convert to Lead‘
-
OR you can select the contact > go to the last column in the listing table & click on ‘Add Opportunity‘.
-
Both actions will let you add an opportunity to the contact & if you convert it to a lead, it’ll now show in the Leads Listing page too.
- Imagine the scenario when you have to perform a task on a bunch of contacts! Wakeupsales has it covered.
-
Just select multiple/all the contacts that are listed. And click on the checkbox you see on the top left corner of your contacts listing table.
-
A click on the checkbox will give you the option to perform action over all the selected contacts at once. Select the available action(s) & it’s done in a second. No more time waste, doing the same thing again and again.
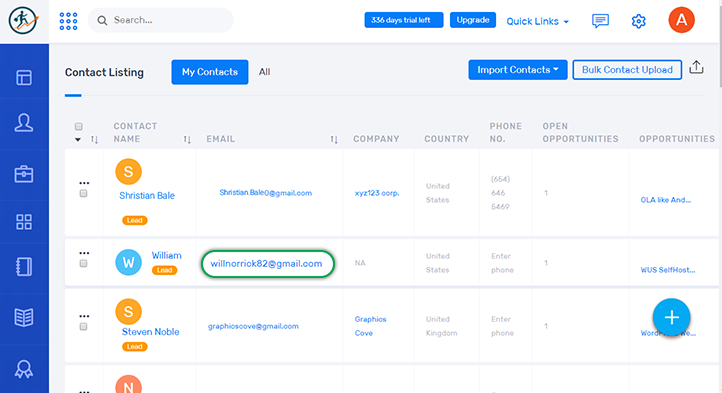
Sending an email to one of your contacts is just a matter of few clicks, with Wakeupsales CRM.
- If you’re on the Contacts listing page & you see your contact’s email id on the table, just click on it.
- Or select a contact > click on the 3dot(…) menu > Choose ‘Send Email’
-
A pop-up will appear in no time, where you need to write your message & click ‘Send‘.
-
The Contact Detail page is where you get to know everything about the person. From his contact details & other info about his colleagues to every task, opportunity & activity associated with him… it’s all there.
-
You can also ‘Edit‘ some of the contact information by clicking on the edit option near its name.
- If you’re on the contacts listing page, editing a contact is super easy.
- Just look out for the ‘edit’ icon near the Contact name & click on it.
- Once you’re done with your changes, click ‘Update‘. It’s that simple!
What is contact’s activity stream?
- If you’re on a Contact Detail page, try to look at the extreme right & you’ll find an ‘Activities‘ tab.
- It displays all the actions associated with the contact, that has happened in the CRM.
- Super useful to take a quick glimpse at what has happened so far.
Yes, of course! Every Wakeupsales CRM subscription comes with an All-inclusive 1 month Free Trial. Get a feel of how much more you can achieve with all this, before making a decision. It’s addictive!
Once the 1 month Free Trial is over, you will be asked to choose a subscription as per your requirement. Once the SuperAdmin takes up a subscription… you can resume your work as before.
We have actually kept it very simple by keeping a ‘Free-for-Life‘ plan & another ‘Pro‘ plan. The free plan has all the features of Wakeupsales, but with certain restrictions. Still, it works just fine.
The ‘Pro‘ plan is where Wakeupsales comes into life with all its powers. There’s no limit to what you can achieve with this ‘Unlimited-everything‘ subscription. Good thing is… it just costs $4 per user per month.
We know your data is important to you. That’s why Wakeupsales lets you download all your data to a local system… before you migrate to the ‘Free-for-Life’ subscription.
However, if you want to be careless about all your data… take up the ‘Pro’ subscription & start working as before.
The Wakeupsales Pro subscription costs only $4 per user/per month, with a monthly billing cycle. The SuperAdmin can also upgrade/downgrade the number of users as & when required. It’s so easy!
Feel free to write to us on ‘support@wakeupsales.com‘ if you want to know more.
If you’re a Cloud Pro User & wish to discontinue for any reason, please write to us at “support@wakeupsales.com” with your request. It’ll be done!
Please note that your subscription will only end after the end of your billing cycle. So for example, if you opt to cancel your subscription on the 5th day of a month… you can keep using Wakeupsales CRM till the end of that month. And if it comes to that, we’d like to know about it. Your feedback & opinions will make Wakeupsales a better product. Write to us at “support@wakeupsales.com”.
If you’re inside the Wakeupsales CRM app, there are two ways to access your Profile page.
- On the left side menu > click on your name > the first option to appear below it would be ‘My Profile‘.
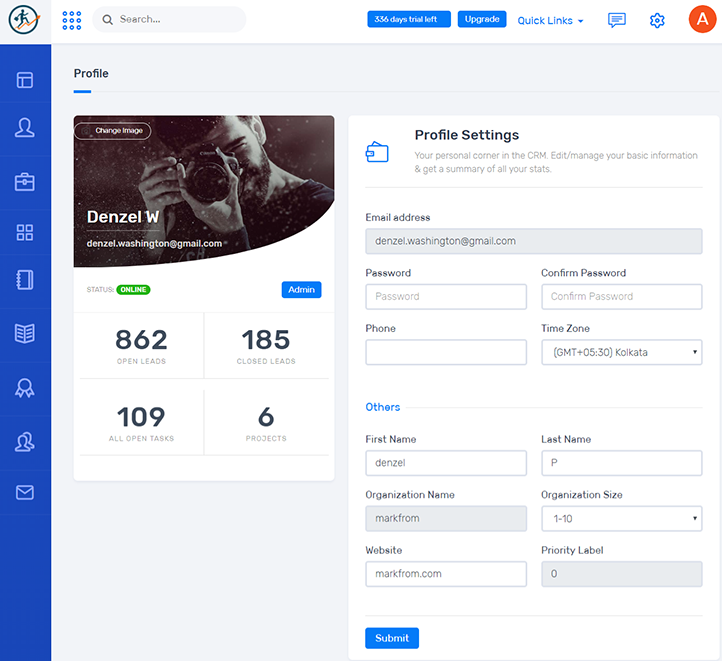
- Another option is to click on ‘Settings’ on the top right corner, & the third option in the drop down will be ‘Profile‘.
If you’re in the Profile page & feel like updating some of your info, we’ve made it super easy to do so. Just click over the field you’d like to update & an inline edit option will pop up. Make your changes & click on the ‘Tick’ button. It’s that easy!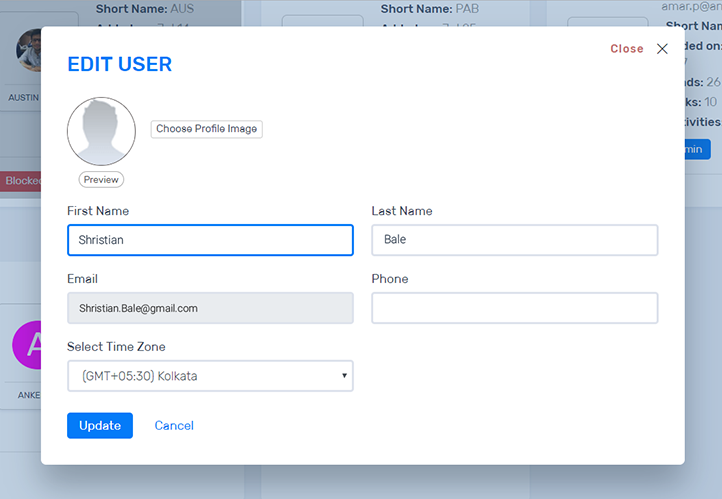
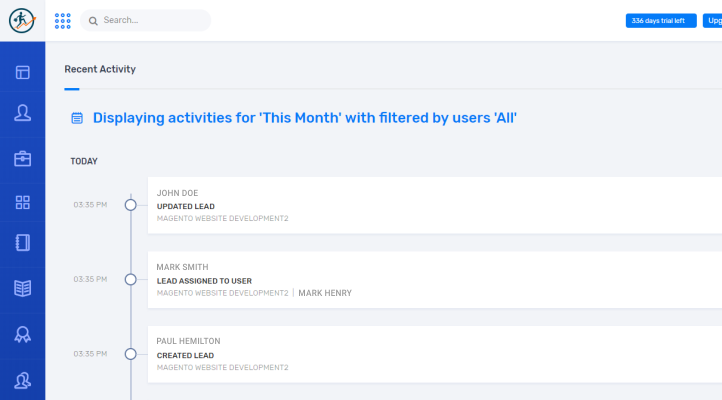
How activity timeline works?
- Contact
- Will track on create, on update & on delete.
- Display the following information.
- Time of activity.
- Small default contact image.
- Contact name with link will be provided to view detail page.
- Created by user information with link to it’s profile page.
- Deal
- Will track on create, assign, update, delete & contact associate.
- Display the following information.
- Time of activity.
- Small default deal image.
- deal title with link will be provided to view detail page.
- Assigned to user name with link to it’s profile page only for assign deal activity.
- Created by user name with link to it’s profile page.
- Note
- Will track on note creation only.
- Display the following information.
- Time of activity.
- Small default note image.
- deal title with link will be provided to view detail page.
- note detail with attachment and link to download the attachment if present.
- Created by user name with link to it’s profile page.
- Task
- Will track on task create, update, assign, follow up & complete.
- Display the following information.
- Time of activity.
- Small default task image.
- deal title and task title.
- Assigned to user name with link to it’s profile page only for assign task activity & due date of the task
- Created by user name with link to it’s profile page.

If you’re new to Wakeupsales CRM or need to simply migrate all your info from another CRM or any other source… It’s easy!
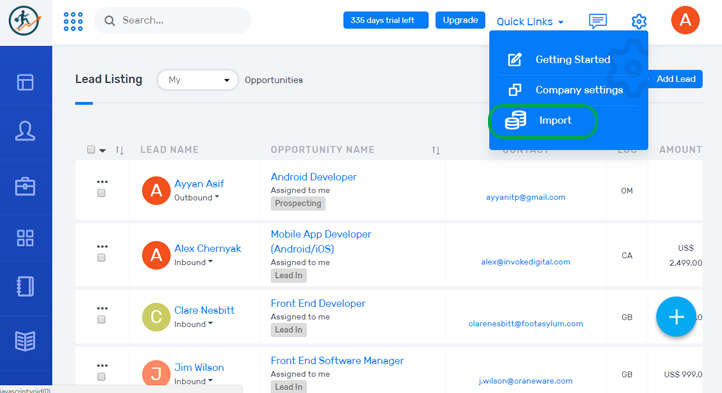 Inside the application, click on the ‘Settings‘ icon on the header & go for ‘Import’. Choose the source you’re importing from, upload your Leads file & it’s done.
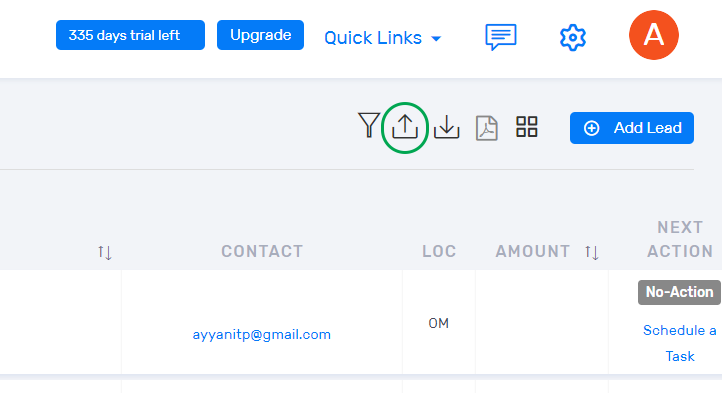
Uploading Leads in bulk is super-easy in Wakeupsales CRM. If you’re in the Lead Listing page… just look for the ‘Bulk Upload‘ icon on the top right corner (right beside the filter option).
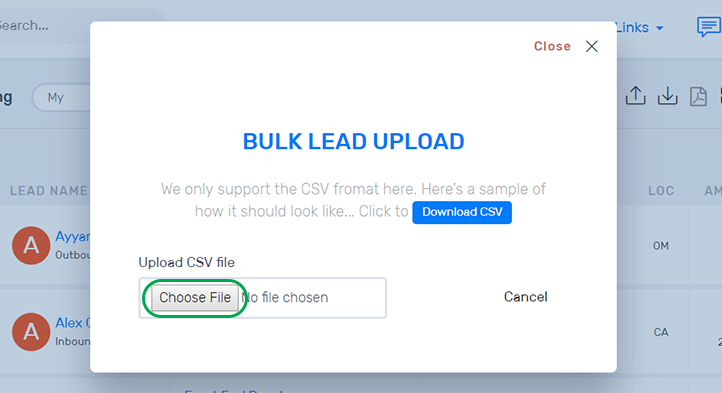
Once you click the ‘Bulk Upload‘ option… a pop up will appear. All you have to do is upload the leads in the Wakeupsales supported format. A sample file is also available for download!
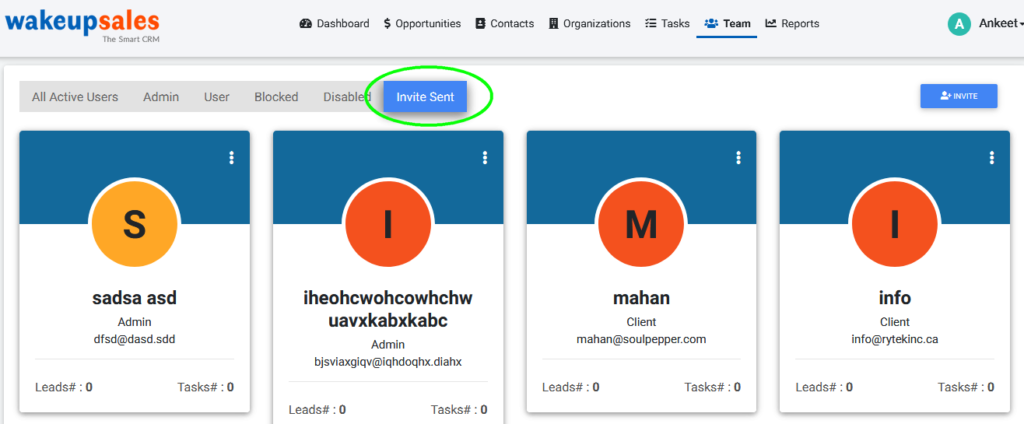
If you’re new to Wakeupsales & have just created your organization… the next step is to invite your team to join you in Wakeupsales CRM. Here’s how you can do it:
- If you’re in the ‘Getting Started‘ page, you can invite someone to join you by clicking on ‘Invite a Person’ from the bottom section.
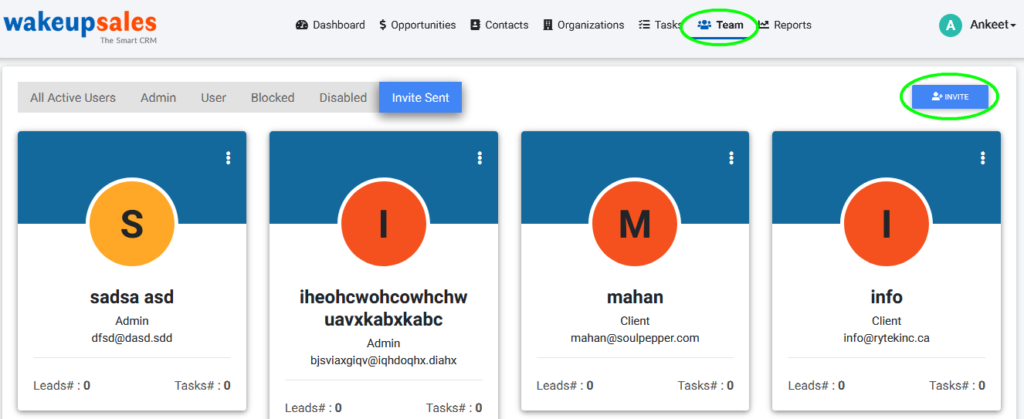
- If you’re elsewhere inside the Wakeupsales CRM, go to Quick Links on the header > Invite a Person.
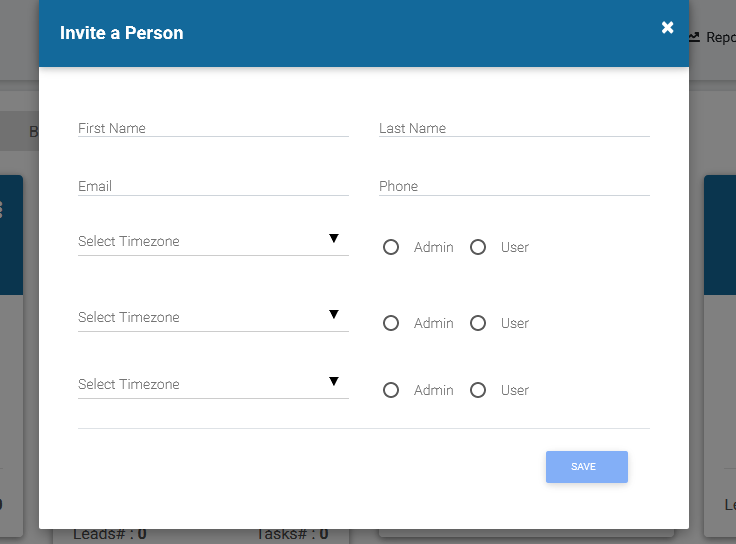
- Just fill up the simple form & the guy will get an email. All he needs to do is to accept your invitation. Voila!
There can three types of people in a team. First is the Super Admin, who’s the creator of this organization with all possible powers. Then come the Admins, followed by the Users.
Admins have relatively less powers as compared to the Super Admin, but are good enough to run your CRM account most of the times. Users have very limited powers & can be dependent on admins for certain tasks.
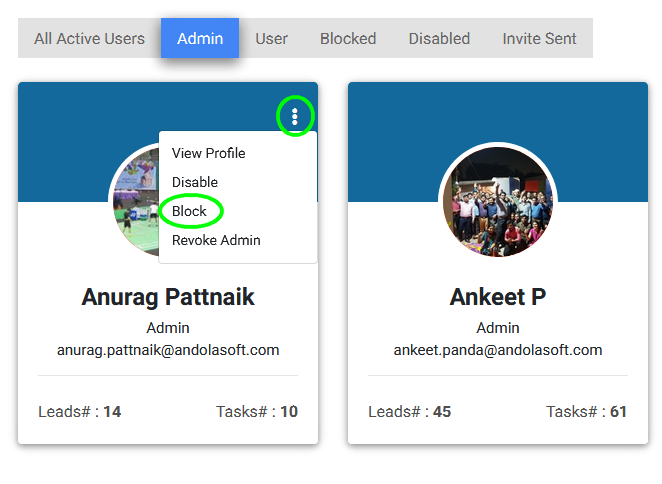
If you’re a Super Admin or an Admin… there are a ton of things you can do in the Team page. Here are a few:
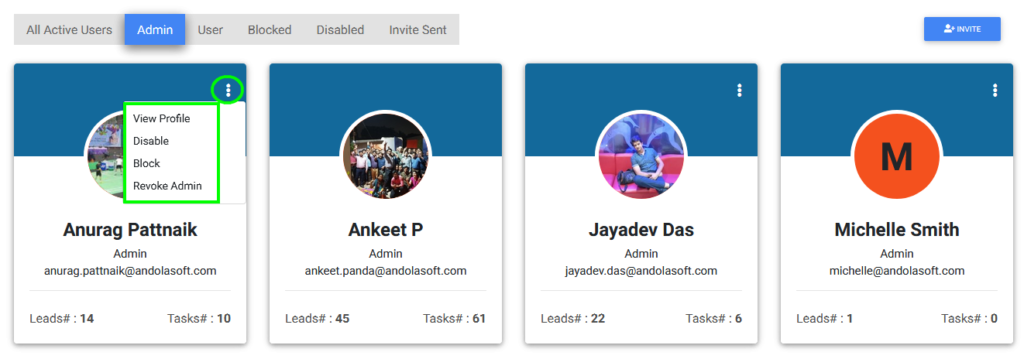
- Assign Lead: Assign more leads/opportunities to any of the invited people.
- Remove Lead: Remove one or more lead/opportunity from someone’s plate.
- Block/Unblock: To keep away any particular person from using the CRM or to reverse it.
- Grant/Revoke Admin: In case you want to give more power to a user or less power to an admin.
- Edit Profile: If you want to make any changes to someone’s basic info.
Blocking a User & disabling him are two completely different actions. ‘Block‘ lets you restrict a user from accessing his Wakeupsales account, while your no. of users count still remains the same. You can unblock anytime you want.
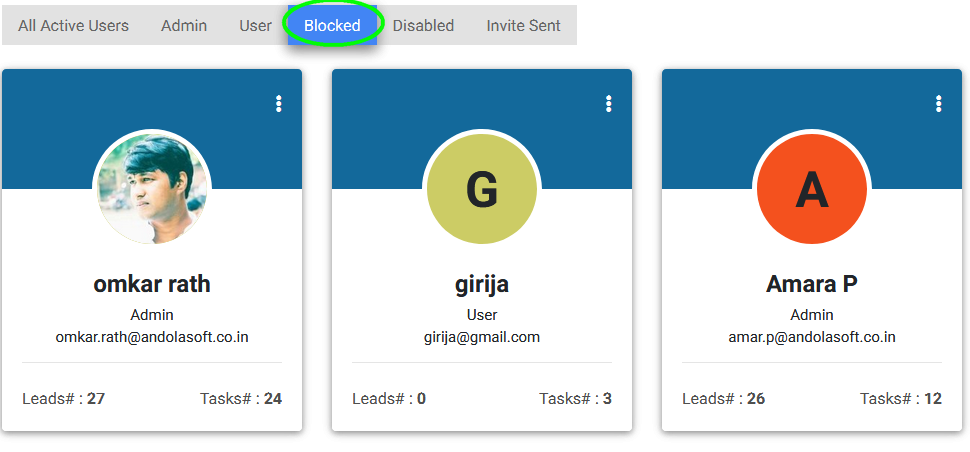 Disabling a User has relatively stronger implications. Not only it restricts the user from accessing his account, it also frees-up a user space from your total user limit quota. So that you can invite another new member to your team.